A Walkthrough of "The Hermetic Order of Alchemists"

A Guide for the Prospective Alchemist

The following is a walkthrough of my Alakajam game, "The Hermetic Order of Alchemists".

It describes not only the steps necessary, but also why the steps are necessary, which might help you in the later steps or Trials.

...or you can just follow the bolded actions, if you just want to move ahead to the ending.

Trial 1: Produce a Resum Crystal
Objective:

Both the goal and the initial substance has the same amount and type of elements. So you need to break the initial Pure Resum substances down into their Resum elements. Then, make them bond into the goal substance Crystallized Crystal.

Solution:
Step 1:

By hovering the mouse over the starting substances, you can see that Pure Resum has a breaking point of Weak Heat. So start by applying Weak Heat (or hotter). This breaks the substances into 4 elements of Resum.

Step 2:

Hover the mouse over the Crystallized Resum under the Expected trial result, or look it up in the Grimoire. Note that the Bonding point of Crystallized Resum is Strong Cold. Apply Strong Cold (or colder) to form the 4 Resum Elements into Crystallized Resum. Note that if you had instead applied Weak Cold or Room Temperature, the Elements would turn back into Pure Resum instead, since the Bonding point of Pure Resum is Room Temperature. The Reactivity of Crystallized Resum is 8, which is higher than Pure Resum's Reactivity of 2. This is why Crystallized Resum form before Pure Resum, if the temperature you apply, is cold enough to be the same (or colder) than the Bonding point of both of these materials.

Trial 2: Produce Bluemetal from raw materials.
Objective:

The starting substances contain two extra Pyx (green) elements, and 1 extra Resum (purple) element, compared to your goal. You therefore need to get rid of these. In the Grimoire, you can see that the substance of Resrem contains exactly the combination of elements you need to remove. Therefore, your goal is to bond some of the starting elements into Resrem, so that you can remove them. The rest of the elements will then be Bluemetal.

Solution:
Step 1:

Start by breaking the starting substances. Hovering over each of them, you can see that the warmest breaking point across them is Searing Heat. So start by Applying Searing heat.

Step 2:

Now, you must rebond the elements. The objective is to bond your surplus elements into a single substance (Resrem), which you can then remove. Looking in the Grimoire, you can see that Resrem has a bonding temperature of Strong Cold. Apply Strong Cold in order to bond the elements into a Resrem and a Bluemetal.

Step 3:

Finally, use filter to remove the smallest substance. Since Resrem has a size of 3 elements, and Bluemetal has a size of 5 elements, this will remove the Resrem, but leave the Bluemetal in the solution.

Trial 3: Produce a Resum Crystal, while getting rid of impurities.
Objective:

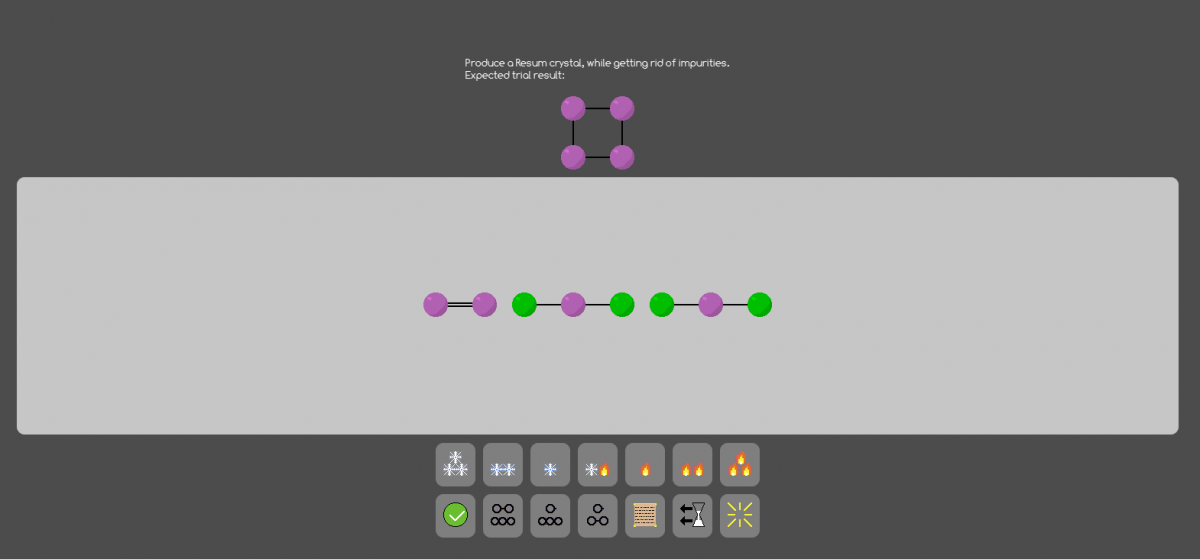
The starting substances contain four extra Pyx (green) elements, compared to your goal. You therefore need to get rid of these. Unfortunately, Resrem is more reactive (and has the same Bonding point) than Crystallized Resum, so you can't use the filtering strategy from Trial 2. Instead you have to form the Resum elements into stable substances, and then purge the unbonded Pyx.

Solution:
Step 1:

Start by breaking the starting substances. Hovering over each of them, you can see that the warmest breaking point across them is Searing Heat. So start by applying Searing heat.

Step 2:

Looking in the Grimoire, you can see that the only substance which only contains Pyx is Pure Pyx. Unfortunately, at its Weak Cold Bonding point, you also find Duresrem, which contains both Pyx and Resum, and which has a higher reactivity than Pure Pyx. So in this case, you cannot isolate the Pyx-elements for filtering. But what you can do, it to find a substance which can bond all of the Resum elements. Then you can purge the unbonded Pyx-elements. In the Grimoire, there are two substances which only contains Resum: Crystallized Resum have a bonding point of Strong Cold, but so does Resrem, and Resrem has a higher Reactivity. However, Pure Resum has a bonding point of Room Temperature, which is warmer than any substance containing Pyx. So apply Room Temperature, in order to bond the Resum elements into Pure Resum, leaving the Pyx elements unbonded.

Step 3:

Use Purge to remove the unbonded Pyx elements.

Step 4:

As in Trial 1, use Weak Heat to break the Pure Resum substances.

Step 5:

Finally, as in Trial 1, use Strong Cold to bond the Resum elements into Crystallized Resum.

Trial 4: Reduce substances to Oprem, while getting rid of impurities.
Objective:

Similar to Trial 3, you need to remove extra elements. But the Reactivity of the possible substances means, that you cannot just break the starting substances, and then apply some degree of cold. Instead, you need to isolate and remove the extra elements, in this case two elements of Resum, before you can bond the remaining elements into your goal substances.

Solution:
Step 1:

Start by breaking the starting substances. Hovering over each of them, you can see that the warmest breaking point across them is Searing Heat. So start by Applying Searing heat.

Step 2:

In Trial 4 you saw that Pure Resum can be easily isolated, since it is the only substance which bonds at Room Temperature. So next, apply Room Temperature.

Step 3:

Now you can use Filter to remove the Pure Resum.

Step 4:

As Oprem has a bonding point of Strong Cold, finally apply Strong Cold to form the remaining elements into Oprem.

Trial 5: Refine Equilibrica from inferior substances.
Objective:

As for earlier Trials, the supplied substances contain extra elements which much be removed. As in Trial 2, the two extra Pyx (green) elements, and 1 extra Resum (purple) element correspond to the elements in Resrem. However, since there are enough elements to create two Resrem substances, you need to bind some of the elements into something different. This leaves only enough elements to bind into a single Resrem, which can then be removed.

Solution:
Step 1:

Start by breaking the starting substances. Hovering over each of them, you can see that the warmest breaking point across them is Searing Heat. So start by Applying Searing heat.

Step 2:

Pure Optium is both very Reactive, and rather temperature stable (it bonds at Freezing Cold, and breaks up at Strong Heat). Tying up the Optium elements first, will ensure that they do not "get in the way" of the later bonding into Resrem. So next, apply Freezing Cold.

Step 3:

The previous step also formed two Resrem elements. You therefore need to break these back into elements. Apply Weak Heat to do so. The Pure Optium will not be changed, since its breaking point is Strong Heat.

Step 4:

Now, you need to find a way to leave only enough unbonded elements to bond into a single Resrem. Since that bonds around a single Resum element, you can bind two Resum elements into Pure Resum, leaving a single unbonded Resum element. As you saw earlier, Pure Resum can be bonded at Room Temperature, so apply Room Temperature next.

Step 5:

Now you can finally form a single Resrem, by applying Strong Cold.

Step 6:

Resrem is the largest substance, as it contains three elements. So Separate it with the Separate tool.

Step 7:

Break up the previously bonded substances, by applying Searing Heat.

Step 8:

Finally bond the elements into Equilibrica by applying Weak Cold.

Final Trial: Refine Bluemetal from Equilibrica
Objective:

The final trial is the hardest, since there are enough elements to form any substance except Crystallized Resuml. Hence, the solution requires mastery of the various properties of these substances. You need to get rid of all the extra elements: 7 Pyx elements, and one Optium element. A logical approach would be to try to get rid of the extra Optium element first, since Optium is a part of most of the substances. After that, you can focus on getting rid of the extra Pyx.

Solution:
Step 1:

Start by breaking the starting substances. Hovering over each of them, you can see that the warmest breaking point across them is Searing Heat. So tart by Applying Searing heat.

Step 2:

Removing the single extra Optium element is the easiest. Start by forming the two other Optium elements into Pure Optium. Do this by applying Freezing Cold.

Step 3:

Purge the unbonded Optium element. As an added bonus, this also gets rid of one of one of the extra Pyx elements.

Step 4:

Break down all the temporary substances again, by applying Strong Heat.

Step 5:

Since there is an even amount of Pyx Elements left, the next sub goal is to merge them into Pure Pyx pairs, which can then be removed. This would leave only the correct elements. But unfortunately, Pure Pyx has the lowest Reactivity of all substances, and a bonding temperature of Weak Cold. This means that almost any other possible substance will bond before Pure Pyx will. The next step is therefore to bind enough of the Optium and Resum elements, so that the remaining Pyx elements can only bond into Pure Pyx. The first step is to bind the Optium Elements into Pure Optium. Do this by applying Freezing Cold.

Step 6:

Apply Weak Heat to break up the Resrem. This does not affect the Pure Optium.

Step 7:

Looking in the Grimoire, you can see that if you can get 2 of the remaining 3 Resum elements to bond into Pure Resum, the remaining Resum element can only bond into Resrem. As you saw earlier, Pure Resum is easy to bond, since it is the only substance which bonds at Room Temperature. So apply Room Temperature next.

Step 8:

Now the remaining elements can only form two different substances: Resrem or Pure Pyx. And as Pure Pyx bonds at a colder temperature than Resrem, you can choose which substance to bond. Apply Weak Cold to form the remaining Pyx into Pure Pyx pairs.

Step 9:

Apply Strong Heat, in order to break the Pure Resum and Pure Optium back into unbonded elements. As Pure Pyx has a breaking point of Searing Heat, these are left unbroken.

Step 10:

Now you can finally get rid of the Pyx, by filtering!

Step 11:

Bluemetal bonds at Weak Cold, so apply Weak Cold in order to bond the remaining elements.
"The Hermetic Order of Alchemists" - Alakajam 1

Learning the secrets of the Alchemists

Last weekend, the Alakajam held its first 48 hour game jam event, with the theme of Alchemy. I participated, and created a new game: "The Hermetic Order of Alchemists".

This time, I decided to make a puzzle game, about transforming and purifying alchemical substances. As in previous game jams, I created the game in Java, using the LibGDX framework. I made the pixel art using Aseprite, and I made the music using Bosca Ceoil.

Designing the game

The game mechanics center around manipulating a number of different substances. You do this by breaking them into their component elements, getting rid of surplus elements, and then reassembling the remaining elements into different substances. Each puzzle is presented as a trial, with a given starting number of substance, and a goal you need to reach. Then, using the tools at your disposal, and your knowledge about the properties of the substances, you have to transform your starting substances into the end goal.

Each substance has a breaking point. This is the hot temperature where it splits into its contained elements. It also has a binding point. This is the cold temperature where it forms from available unbonded elements. And finally, it has a reactivity rating. This determines the priority of this substance forming, if there are enough available elements to form several different substances.

In short, "The Hermetic Order of Alchemists" is a logic puzzle game. You have to decide which substances and processes that will lead you from your starting point and to your goal.

I tried to make each puzzle build upon the earlier puzzles. So while you can get through the earlier puzzles through trial and error, this will make it a lot harder to get through the later puzzles.

Time for some music!

Despite only having 48 hours in this jam, I still found the time to make sounds and even a musical theme for the game. As an extra touch, I added a little voice acting to the game, lending my voice to the annoying Master of Alchemy who are clearly not rooting for your success.

Play the game!

Try "The Hermetic Order of Alchemists" now!

Ludum Dare 39 - "The Liberation of Liberatia"

My Ludum Dare 39 game

I participated in Ludum Dare 39 this weekend, and made a new game. Just as last time, I decided to participate in the 78 hour Jam instead of the 48 hour Compo. While I was still adhering to all Compo rules, this meant that I could make a strategy game, and still have some time left for polishing the final game.

This time, the theme was "Running out of Power". During my brainstorming, I decided to interpret the word "power" as political power. From that, I then decided to make a game about overthrowing an oppressive government. The player weakens the regime by converting the population to their side, which ties in with the "Running out of Power" theme.

As in my previous LDs, I developed the game in Java, using the LibGDX framework.

Brainstorming

Due to the scale of the idea, I decided that the genre of the game should be a strategy game. Since that genre is more complex, I also decided to keep the mechanics simple, by implementing the game as a "one action per turn" turn-based game, with alternating turns between the player and the  AI-controlled regime.

In my original brainstorm, this would happen by gradually taking control of various government departments, and then finally confronting the leader. But with a bit of prototyping, it became clear that this would take too long to implement properly. Instead, I simplified the scope a bit.

I kept the "population as a resource" element from my initial concept as the core element of the mechanics. As the game goal was still to overthrow the regime, I also needed to decide how to create that as an antagonist. Keeping the idea of overcoming multiple obstacles from my initial brainstorm, I decided that the antagonists should be three overlords instead of one.

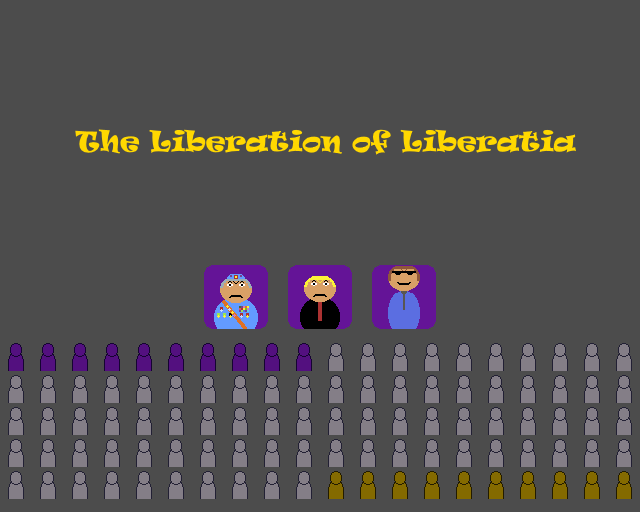
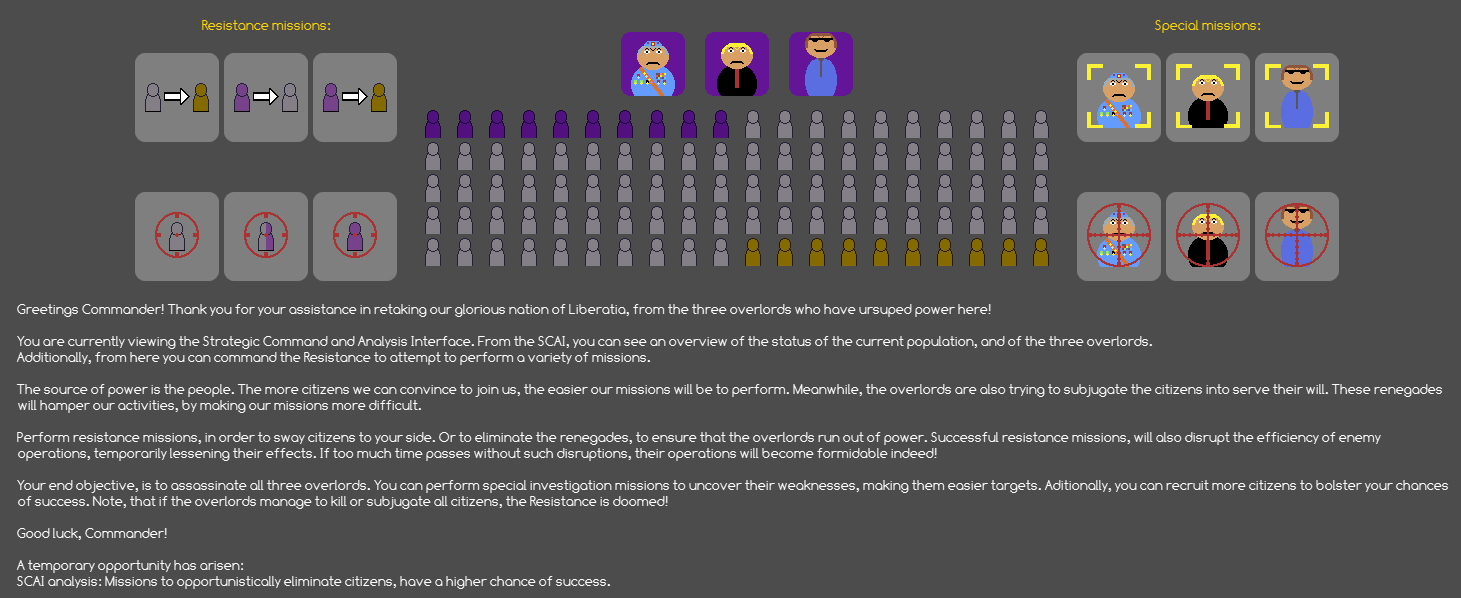
liberate liberatia screenshot

Designing the game

By performing this simplification, the game concept was distilled into two aspects, that the game mechanics needed to cover: A way to get/lose the resource of the game (i.e. the population), and a way to defeat the antagonists.

The base mechanics in my turn based game, was to let the player choose one action per turn. So I mapped these two aspects directly into the actions that can be performed. Firstly, a category of actions that affected the population resource, i.e. gaining control over them, making the opponent lose them, or removing them from the game entirely. And secondly, a category of actions used to affect the antagonists.

The antagonists respond after each turn. Their actions affect the population in the same way as the player. I.e. taking control, making the player lose control, or removing the population from the game. This also introduced a lose-condition.  The game is lost if the antagonists control all remaining population.

I decided, that each type of action would have a base percentage change of success. In order to have a purpose for the population resource, this chance is boosted the more population the player controls. It is also lowered by the amount of population controlled by the opponent.

Lastly I added some extra features for variety. Each round has a random type of action gain a bonus, if attempted. The antagonists' chance of success become higher over time (reset by a successful action performed by the player). And you can perform "investigate"-actions against an antagonist, which give a small permanent bonus to later attempts to depose him.

Finally, some music!

In my previous LDs, music has always been on my TODO-list. But it always ended up being out-prioritized by other features. This time I planned on using 6 hours specifically on sound and music, and prioritized it as a "must-have" feature. So for the first time in seven Ludum Dare participations, I ended up with having actual music and sound for my game! I'm pretty happy with finally reaching that personal milestone. Next on my list: Making good music 😉

Play the game!

Try "The Liberation of Liberatia" now!

Simple data-driven game design

A simple example of data-driven game design in "Above Your Clearance"

In my latest game, I experimented with making my game objects data-driven.

At its core, the concept of data-driven design is to avoid hard-coding the game objects and game logic into the game code. You can implement this to various degrees. For example, instead of defining your different game objects as different Java classes, you can instead define a generic game object structure. You can then define properties and types that you can then apply to these generic objects. In this way, you can "assemble" game objects dynamically, using these properties and types. And your game engine then uses these to handle the game logic. This is the approach used in Entity Component Systems for instance. You could even implement your game-specific logic in a scripting language, which you could then maintain using external tools.

There are several advantages to such an approach. As your game objects are now data instead of code, the game can import them from external data files. You can then alter these files, for instance using an external editor. This means that designers (or modders!) can tweak the game logic, without requiring any code changes. You also get a clear distinction between the game code and the game logic.

The structure of the game

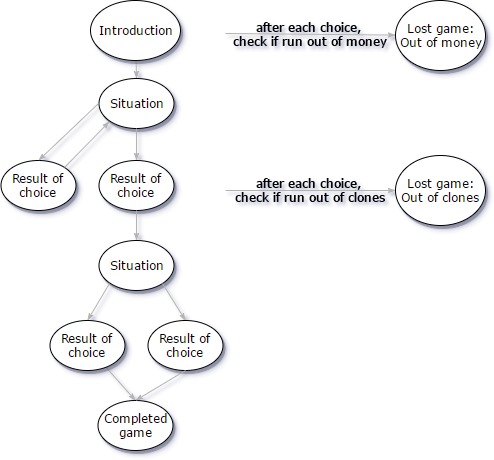
"Above Your Clearance" is a short adventure-game, which follows the format of classic "choose your own path" adventures. This means that the game has a very simple structure. The game presents you with a situation, and then you get a number of choices. Each choice will potentially change the state of the game world, and then move you to a new situation. I designed this structure as series of nodes, connected by choices, which can be simplified into the following diagram:

The flow of the game

Game concepts

I also introduced two resources to the game, credits (money) and clones (lives). If the player run out of either, he loses the game. Additionally, I also included the concept of "plot flags", in order to track the choices made by the player. This means that the game logic boils down to the following concepts:

  • The game tracks which node is currently the active node. The active node is the node which is currently being displayed to the player.
  • A node has a description, which the player can read. It also has a list of choices, which the player chooses from, in order to change to the next node.
  • A choice has a description, describing the choice to the player. It also has a destination, which is the node which will become active if the player chooses this choice. In addition, a choice has a requirement, which checks e.g. a specific plot flag. If it doesn't pass, the choice will not be visible to the player. Finally, a choice can trigger one or more effects. An effect is a specific change to the game world, for instance setting a plot flag, or changing the amount of credits possessed by the player.
  • A requirement is a combination of the type of resource and a value. The game logic uses these to check the fulfillment of the requirement.
  • An effect is a combination of the type of resource and a value. The game logic uses these to change the specified resource by the given amount (or change the specified plot flag).
  • When the player selects a choice, the game logic will apply any effects related to that choice. It will then check whether the player has run out of any resources. If not, it will change the current node to the destination.

A data-driven design approach

As the concepts above include game logic, I had to isolate this from the concepts themselves. Specifically, there is logic to check the requirements, to apply the effects, and to change the active node. As I did not want to implement a scripting language for this game, some hard-coded game logic was necessary.

One approach could be to have different classes for each type of effect and requirement. Those classes would contain a Java-method to apply the the specific effect or perform the specific check. However, this would mean that these objects would contain game-specific logic.

Instead, I implemented a type property for these classes, with a type for each specific effect or requirement. For instance, I implemented a type for "change the number of credits", a type for "set plot flag", etc. I then combined this with a numeric property that specified the magnitude of the effect.

This meant that I could move the game logic into the game code itself. I implemented the game logic itself as Java methods, which would get the effect or requirement as an input parameter. These methods could then use the type and magnitude on the game object, to determine how to handle it.

Implementation

See the source code

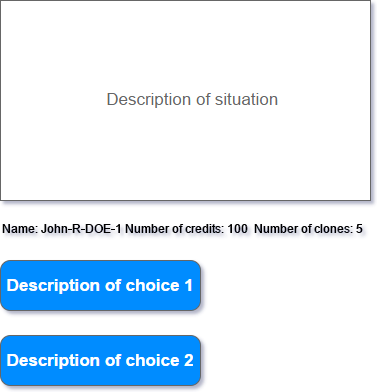
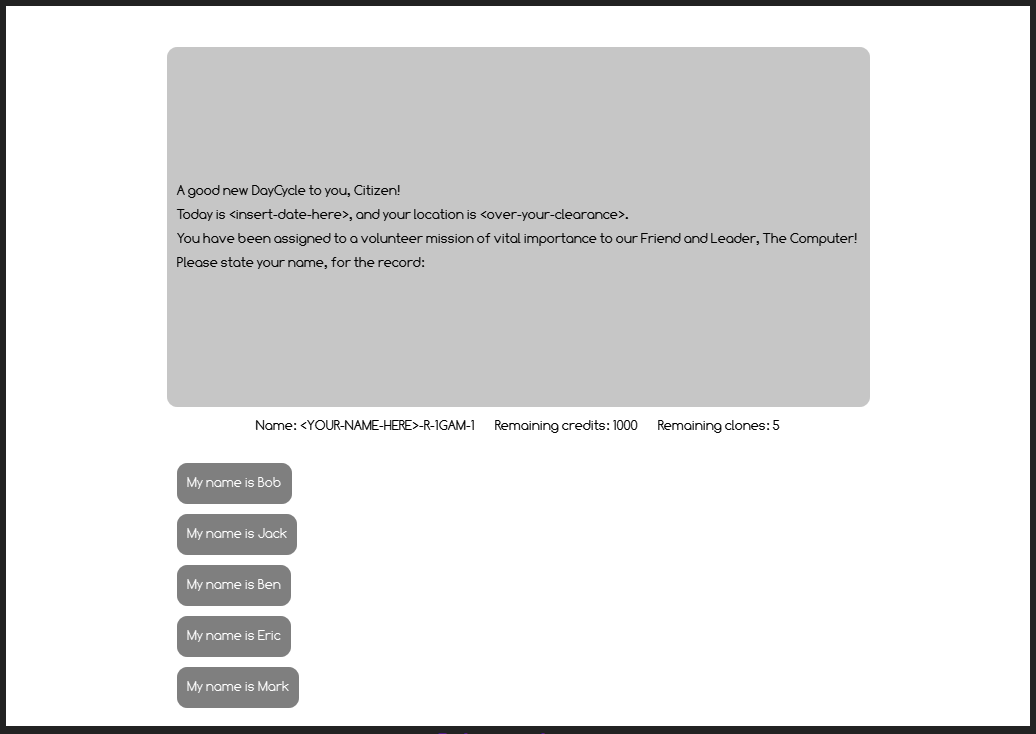
Designing a GUI to handle the above concepts was relatively simple. At any given moment, the player only sees the active node, and the choices related to this node. So I made a GUI to display this information (as well as the current resources). When the player presses a button, it applies the corresponding choice to the game world. It then refreshes the GUI with the contents of the new active node:

GUI mockup

As for the implementation of the concepts above, the data model consists of four data-driven classes:

  • A Node class, which contains a description, a node-number and a list of Choice objects.
  • A Choice class, which contains a description, a Requirement object, a destination node number, and a list of Effect objects.
  • A Requirement class, which contains a type and a magnitude.
  • An Effect class, which contains a type and a magnitude.

Each of these classes only contains properties, no game logic. It would therefore be possible to import them from an external data file. The GUI dynamically shows the currently active Node object. It also determines which choice buttons should be active (depending on their Requirement object). And the choice buttons call the internal game logic, with their corresponding Choice object as a parameter. In all cases, the data-driven classes contain no game logic, only information about how the game logic should handle them.

Try "Above Your Clearance" now, to see the concepts in action!

Conclusion

Hard-coding your game logic directly into your game objects is fast, but it can be inflexible. By using data-driven design, you can handle your game objects and game logic as data, instead of code. This means that you can keep the code separate from your game objects.

Instead, you implement properties corresponding to the game logic you want to support. You can then assign these properties to your game objects. This can make it easier for non-coders to customize and tweak your game play. In addition, this also makes it easier for your game to support external editors, and even modding.


"Above Your Clearance" - a #1GAM game

A text-based "choose your own path" game, made in Java LibGDX.

For my May #1GAM entry, I have created a short humorous "choose your own path" style adventure game called "Above Your Clearance", using Java LibGDX.

In the game, you play as a Citizen in an oppressive society, who are unlucky enough to be selected for an important mission. You then have to navigate through a series of decisions. And you need to do so, without running out of credits or clones (extra "lives").

The setting is loosely based on a tabletop roleplaying game called Paranoia. I intend to use it as an introduction to new players of this game, as a sort of "primer" on the tone of such games.

My focus this time was to build a "data-driven" game: Every game location is displayed using a single reusable UI. The content of this UI is then changed dynamically, as the player progresses through the game. The game objects are implemented as objects with data, but without game logic. An example of this is the Effect object, i.e. what happens when the user chooses a specific choice. It has a type (which is the kind of effect it has on the world). It also has a corresponding magnitude. But it contains no logic about how to apply itself to the world. This means that Effect objects can be defined as data, e.g. in an external data file, or through an external editor. The game logic is instead handled by the core game logic. Here, specific functionality is excecuted, depending on the type and magnitude of a given effect.

Additionally, I made a few more experiments with the Scene2D GUI-api, including building some custom Actor components, that are easier to change dynamically during the game. This ended up working rather well. As I did for my latest LD-game, I also made a HTML-version of the game. The game should scale for both high-DPI and normal-sized screens as well, which also took some experimentation.

Play the game!

Try "Above Your Clearance" now!


The Morix Colony: A Post Mortem

Introduction

The following Post Mortem contains my reflections on what went well, and what did not go as planned, during the creation of The Morix Colony, my recent Ludum Dare 38 submission.

Background:

The Morix colony is a turn-based strategy game, in which a young nobleman was banished from the Imperial Court by his older brother. He was sent to the small remote planet of Morix, to act as its new governor. Using the resources of his new world, he will extract raw materials, amass wealth and influence, upgrade the colony, and fight off (and/or bribe) marauding space pirates. Eventually, he will become powerful enough to be able to repay his brother for the injustice.

It was made in my sixth Ludum Dare, and was my first time participating in the Jam instead of the Compo.

What went well:

  • Story - I’m glad I took the time to work out a story as my first task, as it gave the player a specific goal to achieve. At the same time, it gave me a contextual framework for all the other writing in the game. This meant that I could frame all the other events, resources and NPCs in terms of how it helped the ambitious main character in achieving his goal.
  • Participating in the Jam - I usually participate in the Compo, but this year I decided to participate in the jam instead. I followed the same restrictions as the Compo, but for the extra time. I really enjoyed having time to make some deeper gameplay, a proper story, and a more polished end result this time.
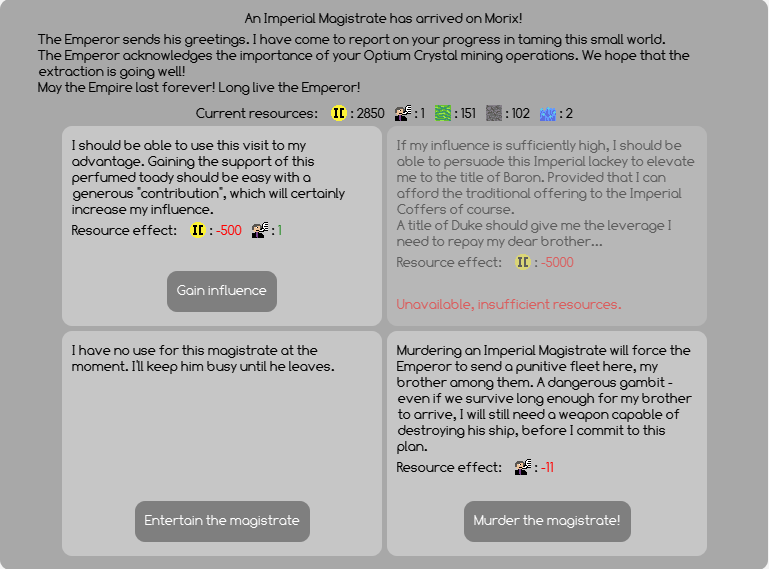
  • Content - I am happy with the amount of content I managed to include in the game this LD. I managed to include a variety of gameplay elements and resources interacting with each other. I had time for a greater variation in the writing, and even made two different endings. I also managed to implemented a good deal of reactivity: The NPCs addressing you differently depending on your reputation and social status. The random events changing if you become a criminal (or as a result of various actions through the game). And your advisor has different reaction facial expressions, depending on the news of the round. Just to mention a few.
  • Mechanics - I am quite satisfied with the mechanics I implemented. The interplay between the resources, the colonist allocation and the random events worked out pretty well. The gameplay naturally evolves into three different phases: Forst a survival phase in the beginning, where death could come swiftly. Then, this is gradually replaced by gaining traction, as you start to be able to buy upgrades, and are able to take advantage of the positive random events. And then, finally the feeling of power and stability, as you amass wealth and resources in preparation for victory. I also think I hit upon a good number of different resources. They behaved similarly in some respects, but also had unique uses to justify their separate existence.
  • UI - I was pretty satisfied with how the UI turned out. It seems that the tooltips in particular, worked well in explaining the game mechanics. I also feel that I struck a good balance between gameplay complexity and a simple interface. I also wanted to have tracked the colony upgrades in the UI, but I did not have the time to make the icons, so that instead became part of the end-of-game score.

Morix Post Mortem - Magistrate event

Things that didn't go as planned:

  • Scope - My scope ended up a bit too large. I had to cut a few features, like extra facilities and upgrades that would have given the player more control over the random events. For instance the ability to assign colonists to defense, or to operate a radio facility, which would allow finer control over the probability of the random events. I’d liked to expand upon the mechanics even further, with a few more facilities, upgrades, and events for variety’s sake.
  • Early game - The early game suffered a bit from the cuts mentioned above. In the beginning, before you have built up a stockpile of resources, there is not a lot to do, except for advancing the clock, and hoping for some good random events, to be able to survive the pirate attacks. I had originally planned for an extra “game phase” in the beginning. There you would spend your first turns building up the colony. This would culminate in the construction of a space port, and mark the beginning of getting the “visitor” random events. Instead, I tweaked the pacing of the beginning, so that you have to balance your growth with being able to keep the pirates at bay. But the randomness of this phase felt frustrating to some players.
  • Content - While I built a lot of reactivity and details into the game, I think I should have adapted this effort to the kind of event that Ludum Dare is. The time spent on multiple endings, and creating a lot of subtle details that will only be seen after playing for quite a while, could probably have been better spent on improving the early game experience.
  • Tool-familiarity - I made the game using Java and LibGDX, which is my usual tool set. But this time, I ended up spending several hours on Saturday, on experimenting with mouse-over, and drag and drop functionality. I should definitely have practiced more on using the UI-toolkit before the event itself.
  • No music or sounds - Every LD I want to make some music and sound, but in most of them I fail to allocate the time for it. For sounds, I usually use BFXR, but I think I have to find a simple music tool without a daunting amount of features, much like the simplicity of Aseprite allows me to make functional pixel graphics. If you know of any such music creation tool, I’d appreciate it if you would leave a comment!

Morix Post Mortem - Planet Morix

Conclusion

This has been one of my most enjoyable Ludum Dare events so far. Due to the extra time from the Jam, I had time to experiment with some deeper mechanics than usual. I was also able to spend more time on the writing and story, and to create a user-interface that feels more “alive” than in my previous games. I’ve also enjoyed the post-LD gaming, I feel that I’ve played some real gems this time!

Ludum Dare 38 - "The Morix Colony"

Another April, another Ludum Dare

As I have a few days off this week, I decided to participate in the Ludum Dare Jam this time. My intention was, that the extra time would give me the opportunity to create some more substantial mechanics. And as an extra bonus, that I would finally have the time to make some sound and music for my game.

The theme for this LD was "A Small World". I did not find this theme to be very inspiring, to be honest, but after brainstorming for a few hours, I did manage to come up with an idea: The player is a former noble in a galactic empire. He is banished to a small and politically insignificant world (applying the theme in both a literal and a figurative sense). From here, he has to amass enough money to bring him back to the imperial court. He does this by managing the resources of his small colony.

Planet Morix - Ludum Dare 38
The Planet Morix

The game therefore ended up as a turn-based strategy game. The player allocates his population to resource production, which accumulate over time. And at semi-random intervals, he will be presented with random events, where he has to make a choice about what to do.

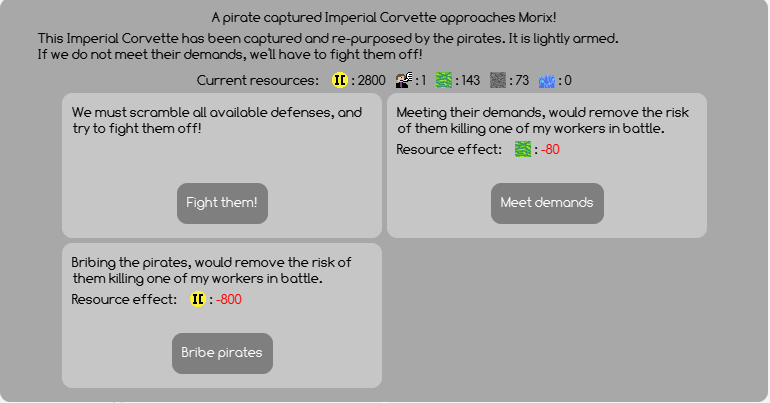
The types of events vary: Sometimes the player gets an opportunity to buy or sell a specific kind of resource. Sometimes, with sufficient resources, he can upgrade his colony in various ways. And sometimes, he is threatened by hostile space pirates, demanding tribute.

The gameplay is somewhat similar to "The Organization", which is one of my previous LD-games. However, this time I had extra time from participating in the Jam rather than in the Compo. This allowed me to better balance the random events and resource allocation elements.

I made the game in Java, using the LibGDX library. This time, I focused on experimenting with the Scene2D GUI-api.

Play the game!

Try "The Morix Colony" now!


Creating a game each month for a year? I've joined 1GAM!

1GAM - creating 12 games in a row

I recently stumbled across a site called One Game a Month (also known as #1GAM or just 1GAM).

It presented a simple-sounding, and yet seemingly collossal challenge: Make a video game each month, for an entire year!

I've decided to join this challenge, with my latest MiniLD entry as my first #1GAM entry.

For the next year, I pledge to create a video game each and every month!

Why join?

I've noticed that I never release most of my game experiments and prototypes. Instead I work on them for a while, only to abandon them once a more interesting experiment turns up.

With the 1GAM concept, I'll have a reason to finish at least one prototype of some kind every month. And it will be a great excuse to experiment with some various ideas.

I've especially missed creating classical text adventures, so I imagine that I'm going to experiment with various frameworks for these in the months to come.

And of course, every four months, a new Ludum Dare entry will be added to the list...